Another Kapri
27 Jun 2026
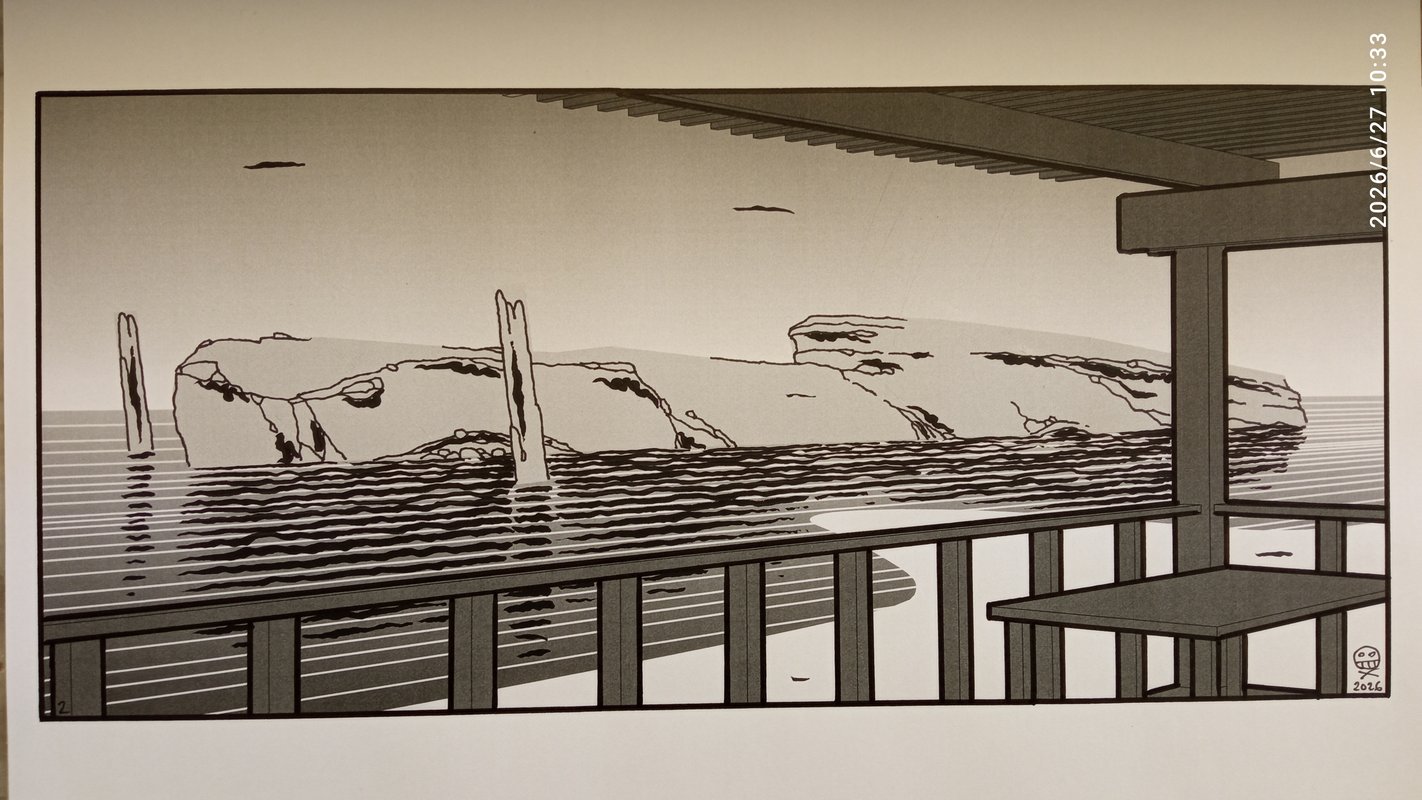
Over a year ago, I dreamed of this alternative Capri, and ever since, I've wanted to draw it. To do so, I've applied a particular workflow.
English text
Meanwhile, here's the transcript of the dream:
... after, on a beach, I was walking down from a restaurant on a strip of sand, and I saw an island that looked like Capri, but smaller and ship shaped, with pinnacles all around. The waves threatened me as I tried to take a picture. Occasionally I went under, and the water was full of urchin fragments. I even complained a few stings.
Here's the workflow:
First, I modeled the porch in CAD, chose a viewpoint and printed it to PDF. I imported the PDF back into CAD, converting it into lines. After re-creating the focal points, I drew the shape of the island, the beach, the waves, and the backgrounds. I printed everything on paper, put on my old man glasses and completed the drawing with various markers. I made three versions, I'm keeping one for myself and I'm giving the other two as gifts to friends who have a special relationship with the island.
Testo in italiano
Più di un anno fa sognai questa Capri alternativa, e da allora volevo disegnarla. Per farlo ho applicato un workflow particolare.
Intanto qui di seguito la trascrizione del sogno:
... poi su una spiaggia scendevo da tipo un ristorante su una lingua di sabbia e avevo davanti un'isola come fosse Capri, ma più piccola e a forma di nave, faraglioni intorno, le ondate mi insidiano mentre cerco di fare una foto, vado anche sotto, l'acqua è piena di frammenti di riccio, in seguito lamento anche qualche puntura.
Ecco il workflow:
Per prima cosa ho modellato in CAD il portico, ho scelto un punto di vista e l'ho stampato su PDF. A seguire ho importato il PDF nel CAD trasformandolo in linee. Ripresi i punti di fuga ho disegnato la forma dell'isola, la spiaggia, le onde e gli sfondi. Ho stampato tutto su carta, ho inforcato gli occhiali da presbite ed ho completato il disegno con pennarelli di vario tipo. Ho fatto tre versioni, una la tengo per me, altre due le regalo ad amici che hanno un rapporto particolare con l'isola.
Here you can find related articles: Kapri
Blog revamped
22 Jun 2026
In the last few months I've been revamping this website. Nothing spectacular, but I upgraded all dependencies, cut dead branches and added some functionalities. If you want to skip all my rants read Copilot's summary based on actual commits.
English text
A bit of history
digitalkOmiX.com has been around since 1999. Initially a static site, it went through a WordPress era, and then blueprinted from a standardized Django project, the source code of which can be found on GitHub. Below is the description of the standardized starter-fullstack repository, launched four years ago:
It was supposed to be a fullstack Django+Vue starter project, but in the meantime I discovered HTML (thank God), so it's just a Django 4.2 starter project. It features a custom User and django-allauth authentication with Google. Content management with FlatPage, HomePage, and Article models.
So it's not a Django app, but an entire project, complete with all the configuration files. When I needed to develop a new site from the standard project (for example, digitalkOmiX.com), I would create a new branch from the main branch and make the necessary changes there. For deployment, I would go to the server and clone the branch. Not the best in maintainability: every time I upgraded the main project, I had to rebase it on the branch (being careful not to overwrite the configuration files) and upload the changes to the server.
Shortly before Django 5.0, I created a new repository (dj5-starter) to continue my elaborations, so everything related to the old project was left behind. And so I doubled the maintainability problem.
What to do?
The problem with software is that it ages, especially when using a framework that relies on a series of libraries. If the libraries aren't updated, you risk using insecure versions. Since I have little time for coding (I don't do it professionally), I can't keep up with multiple projects, and digitalkOmiX.com needs to survive for another few decades.
The Evolutionary Strategy
To transition the site from Django 4.2 to 6.0, I had at least three options:
- Make the appropriate changes to the original
branch; - Create a new branch on the more modern repository (
dj5-starter, ready for Django 6.0), implementing the features of the originalbranch; - Create a new repository with only the features of the original
branch, freeing myself from this repository/project madness;
The alternatives were appealing in ascending order, since it's fun to dive into a new project. After a few attempts, I realized that the only possible option was the first: digitalkOmiX.com is made up of thousands of articles with thousands of associated images. Each of these objects is represented in the database, with all the necessary relationships between different objects. For me, the database is a bit like the Devil, I try to stay as far away from it as possible, I let Django do the dirty work with its ORM.
So, go with route number 1.
Development
I've been away from coding for at least a year, as the commitment was eating too much time from productive activities, so I didn't realize how much Artificial Intelligence had impacted the field. I use VS Code, and now, whatever you do, you have Copilot perched on your back telling you "Do this, do that." Sometimes it's incredibly useful, when you approach things in a standard way it knows exactly what you want to do and you just follow the suggestions. In other situations its stochastic bulimia is incomprehensible, if not simply wrong. I've noticed that Copilot's behavior is particularly destructive on templates (files that mix HTML and conventional tags for dynamic content), and I've damaged perfectly functioning files more than once.
Conclusions
I managed to update all the libraries, eliminated dead branches and added a series of features:
- Article collection for "Stories"
- Open Graph metadata for the site and for individual Articles/Stories
- RSS feed!
- Automatic publishing to Mastodon
However, I wasn't able to dismantle the site's structure (Django project instead of Django app), and I'll pay for that in the future.
Finally, as a bonus, I enabled Copilot to generate a summary of the site's changes based on the commits from the last few months.
Testo in italiano
Un po' di storia
digitalkOmiX.com esiste dal 1999, inizialmente era un sito statico, poi ha passato un'era WordPress e poi si è trasformato in un progetto Django standardizzato di cui trovate il codice sorgente su GitHub. Qui di seguito la descrizione della repository standardizzata starter-fullstack, inaugurata quattro anni fa:
It was supposed to be a fullstack Django+Vue starter project, but in the meanwhile I discovered HTMX (thank God) so it's just a Django 4.2 starter project. Features a custom User and django-allauth authentication with Google provider. Content management with FlatPage, HomePage and Article models.
Quindi non è una app di Django, ma un intero progetto, con tutti i file di configurazione. Quando dal progetto standard dovevo sviluppare un nuovo sito (per esempio digitalkOmiX.com), figliavo un nuovo branch dal main, e lì facevo le modifiche necessarie. Per il deployment, andavo sul server e clonavo il branch. Non il massimo della manutenibilità, ogni volta che facevo un upgrade sul main, dovevo farne il rebase sul branch (stando attento a non sovrascrivere i file di configurazione), e caricare le modifiche sul server.
Nel giro di poco, in vista di Django 5.0, ho creato una nuova repository (dj5-starter) dove proseguire le mie elucubrazioni, per cui tutto ciò che era legato al vecchio progetto è rimasto indietro. E così ho raddoppiato il problema di manutenibilità.
Che fare?
Il problema con il software è che invecchia, soprattutto quando si usa un framework dipendente da una serie di librerie. Se le librerie non vengono aggiornate, si rischia di utilizzare versioni poco sicure. Avendo a disposizione poco tempo per il coding (non lo faccio per professione) non posso stare appresso a progetti multipli, e digitalkOmiX.com deve sopravvivere per qualche altro decennio.
La strategia evolutiva
Per traghettare il sito da Django 4.2 al 6.0 avevo a disposizione almeno tre strade:
- fare le opportune modifiche sul
branchoriginale; - fare un nuovo branch sulla repository più moderna (
dj5-starter, già pronta per Django 6.0), impiantando le funzionalità delbranchoriginale; - fare una nuova repository con le sole funzionalità del
branchoriginale, svincolandomi da questa follia della repository/progetto;
Le alternative erano allettanti in ordine crescente, dato che è bello gettarsi in un progetto nuovo. Dopo alcuni tentativi, mi sono reso conto che l'unica strada possibile era la prima: digitalkOmiX.com è composto da migliaia di articoli a cui sono associate migliaia di immagini. Ognuno di questi oggetti è rappresentato nel database, con tutte le dovute relazioni tra oggetti diversi. Per me il DataBase è un po' come il Diavolo, cerco di starne più lontano possibile, il lavoro sporco lo faccio fare a Django, con il suo ORM.
Quindi vada per la strada numero 1.
Sviluppo
Sono stato lontano dal coding per almeno un anno, dato che l'impegno stava erodendo tempo alle attività produttive, per cui non mi ero reso conto di quanto l'Intelligenza Artificiale avesse impattato il campo. Io uso VS Code, ed ormai qualsiasi cosa tu faccia hai Copilot appollaiato sulla schiena che ti dice "fai questo fai quello". A volte è utilissimo, quando si approcciano le cose in modo standard sa esattamente cosa vuoi fare e basta seguire i suggerimenti. In altre situazioni la sua bulimia stocastica risulta incomprensibile, se non semplicemente sbagliata. Ho notato che sui template (file che mescolano HTML e tag convenzionali per il contenuto dinamico) l'azione di Copilot è particolarmente distruttiva, e mi è capitato più di una volta di danneggiare file perfettamente funzionanti.
Conclusioni
Sono riuscito ad aggiornare tutte le librerie, ho eliminato i rami secchi, ho aggiunto una serie di funzionalità:
- Raccolta degli articoli per "Storie"
- Meta Open Graph per il sito e per i singoli Articoli / Storie
- RSS feed!
- Pubblicazione automatica su Mastodon
Non sono però riuscito a disarticolare la struttura del sito (progetto Django invece di app Django), e quasta cosa la pagherò in futuro.
Alla fine come contentino ho consentito a Copilot di generare un sommario delle modifiche al sito partendo dai commit degli ultimi mesi.
Copilot's summary
Optimized tool selection. Checking commit history since March 2026 to summarize branch changes.
Ran terminal command: cd /home/andywar65/digitalkomix/starter-fullstack && git branch --show-current && git log --since='2026-03-01' --oneline --decorate --all --graph | cat
Branch summary since March 2026
Current branch: digkom (HEAD -> digkom, origin/digkom)
Main changes
- Story management
- Added a Story feature with list views, templates, and navigation links.
- Introduced Shot 2 Story association model and story/article association workflows.
- Added admin actions and forms for associating articles with stories.
- Added reorder/remove article actions inside stories.
- Added article count display in story list.
- Shotgun model enhancements
- Added fields for published, toot, slug, Mastodon publishing handle, and date/time.
- Filtered out non-published shotguns in views/querysets.
- Added open graph support and image thumbnails for story/shotgun templates.
- Added shotgun story list and improved pagination/details.
- UX and template fixes
- Fixed infinite scroll and search result refresh behavior.
- Added links to stories from shotgun cards.
- Improved navbar behavior and added a dedicated navbar view.
- Added search box with Hyperscript and refreshed navbar on profile changes.
- Internationalization
- Added i18n messages.
- Added a language selector and filtered flatpages by language.
- Cleanup and modernization
- Removed legacy filebrowser and Grappelli support.
- Deleted old homepage and article models/templates.
- Removed outdated footerlink/icon fields and related legacy assets.
- Reworked templates and fixed admin naming.
- Dependencies
- Updated requirements for Django 6.
- Added/updated lockfile and dependency sync changes.
Current tip
Latest commit: 364eb3b — added action reorder articles in stories
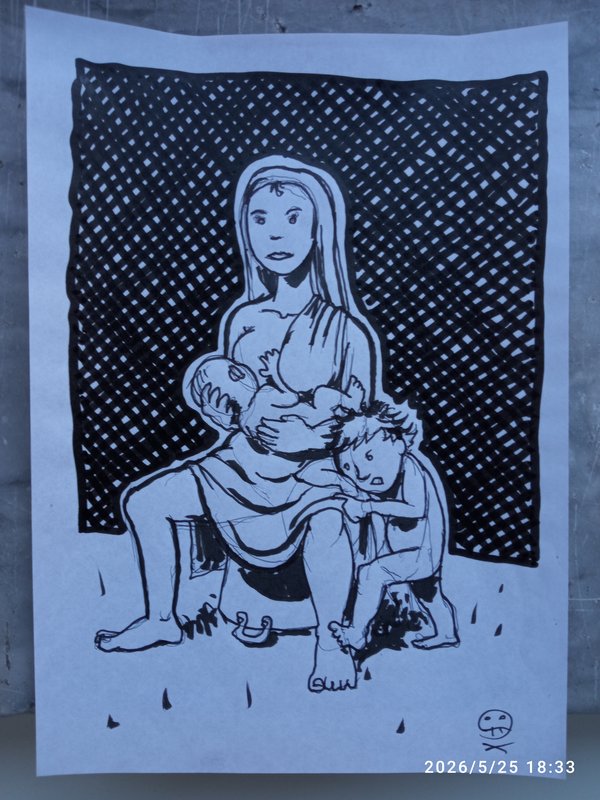
Mary of the Bucket
25 May 2026
Mother feeding the baby. Elder son feels jealous. Sketch, ballpen, feltip, brush, Prockey.
Link to this articleStories
16 May 2026
I've added a new way to read articles on my personal blog: Stories.
English text
Historically (since 1999), articles published on my blog appear in chronological order, starting with the most recent. This mode has limitations when it comes to linked articles, which should be read from oldest to newest.
To address this limitation, I've developed article containers called Stories. In a story, the order of the articles can be customized, and articles can appear in more than one story. So far, I've created a couple of stories, but the combinations are endless.
I had a lot of fun developing this feature, but I'll talk about it in another article that may eventually end up in another story.
Testo in italiano
Sul mio blog personale ho aggiunto una nuova modalità di lettura degli articoli: le Storie
Storicamente (dal 1999) gli articoli pubblicati sul mio blog appaiono in ordine temporale, partendo dal più recente. Questa modalità ha delle limitazioni quando si hanno degli articoli concatenati, che converrebbe leggere dal più antico al più recente.
Per ovviare a questa limitazione ho sviluppato dei contenitori di articoli, le Storie. Nelle storie la sequenza degli articoli può essere decisa a piacimento, e gli articoli possono comparire in più di una storia. Per ora ho composto un paio di storie, ma le combinazioni sono infinite.
E' stato molto divertente sviluppare questa funzionalità, ma ne parlerò in un altro articolo che eventualmente andrà a finire in un'altra storia.
Details in translation

21 Apr 2026
Using the <details> HTML tag to show long texts in different languages
English text
I've always tried to include bilingual English/Italian text in my articles to broaden my potential audience. The problem arises when an article's text is very long, and the translation ends up at the bottom of the page. You could use links between sections of the page, or more sophisticated methods, such as the one used by django-modeltranslation (the field to be translated is divided into two or more subfields, called depending on the active LANGUAGE).
Lately, I've been using the <details> tag to compact long sections of text (not necessarily in different languages). The mechanism is elegant, native HTML, and facilitates infinite scrolling for those who just want to look at the figures.
Testo in italiano
Ho sempre cercato di avere il testo bilingue inglese / italiano nei miei articoli in modo da ampliare il potenziale pubblico. Il problema si pone quando il testo di un articolo è molto lungo, e la traduzione va a finire in fondo alla pagina. Si potrebbero utilizzare link tra una sezione e l'altra della pagina, oppure metodi più sofisticati, tipo quello che utilizza django-modeltranslation (il campo da tradurre viene suddiviso in due o più sottocampi richiamati a seconda del LANGUAGE attivo).
Ultimamente sto utilizzando il tag <details> per compattare sezioni lunghe di testo (non necessariamente in lingue diverse). Il meccanismo è elegante, nativo HTML, e facilita lo scrolling infinito per chi vuole solo guardare le figure.
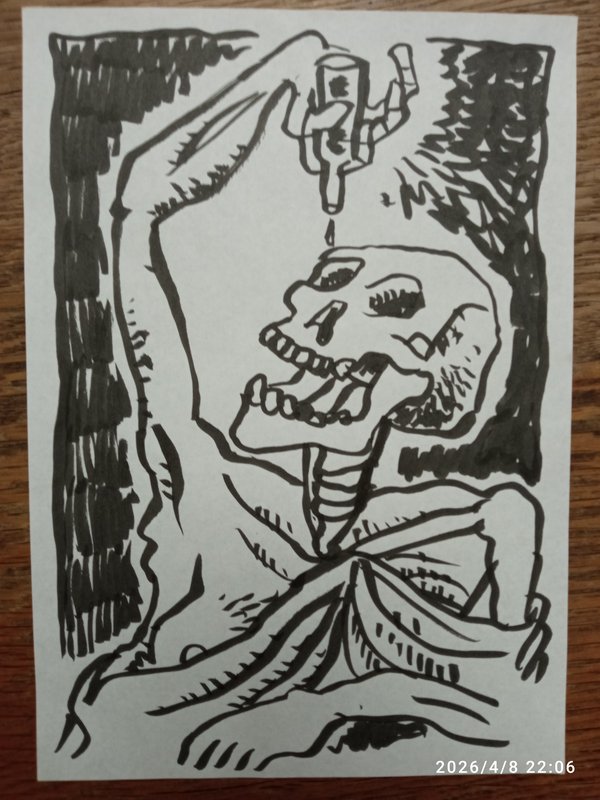
Optical skull
08 Apr 2026
Just a sketch...
Link to this article